Crisp potato rounds and tender green beans seasoned with garlic make a satisfying side dish for grilling season. If you don't have a large rimmed baking sheet, use two smaller pans, one for the potatoes, the other for the green beans and garlic.
A family traditional recipe
3 tablespoons olive oil, divided
2 large russet potatoes about 1 1/2 lbs
unpeeled, cut crosswise into 1/2 inch thick slices
3/4 teaspoon coarse salt, divided
1/8 teaspoon pepper
12 oz green beans
5 medium garlic cloves, unpeeled
2 tablespoons chopped fresh parsley
Heat oven to 425.
Spread 2 tablespoons of the oil in large rimmed baking sheet,
Arrange potatoes on baking sheet in a single layer, turn to coat both sides with oil
Sprinkle with 1/2 teaspoon of the salt and pepper
Bake 22 to 25 minutes or until golden brown
Turn move to one side of pan
Add green beans and garlic to empty side of pan, sprinkle with remaining salt.
Bake 15 minutes
Arrange potatoes on platter.
Squeeze garlic from skins onto cutting board
mash with side of knife until smooth
Toss mashed garlic and remaining 1 tablespoon oil with beans, place over potatoes.
Sprinkle with parsley.
Start Saving Today!
May 27, 2010
Wandas Buttery Biscuits

- 2 cups all-purpose flour
- 1 tablespoon baking powder
- 1/4 teaspoon saltshopping list
- 1/4 cup (1/2 stick) cold unsalted butter, cut into small pieces
- 3/4 cup skim milk, or whole milk
- Preheat oven to 400.F
- In a large bowl, combine the flour, baking powder, and salt.
- Using a pastry blender or 2 knives or your fingers, cut the butter into the flour mixture until the mixture resembles coarse crumbs.
- Using a fork, stir in the milk until a soft dough forms. Gather the dough into a ball.
- Place the dough baking sheet. With lightly-floured hands, press it evenly into a rough 6 x 6 inch square.
- Using a spatula or the dull side of a knife, cut dough evenly into 12 biscuits without completely separating them.
- Bake until lightly golden, about 15 to 20 minutes.
- Transfer pan to a wire rack and cool for 10 minutes.
- Serve warm
Wandas Basic Sourdough Starter
- Make and maintain your own sourdough starter
- you can make your own.
- you'll need a volume of at least one and 1/3 cups.
- There are several ingredient combinations for making wildshopping list
- yeast sourdough:
- - One is to grate a raw potato. Then add enoughwater to cover
- and enough flour to make a thin batter of about a cup and a
- third in volume.
- - Another method is to use water that you've boiled potatoes
- in instead of the grated potato and watercombination.
- - You can also use flour, sugar and water. Use one cup of
- flour, a tablespoon of sugar and enough water to make a
- pancake consistency batter.
- - Yet another is to simply mix together equal amounts of water
- and flour (whole wheat is best for this).
- Anything that provides food for the yeast and a good growing
- environment will work. yeast needs sugar or carbohydrates
- (which it converts to sugar), and clear liquid.
- Make your choice based on what you have handy and just because
- that's what you'd like to try. Don't worry about whether or
- not one set of ingredients will work better than another,
- because the chances are that they will all be equally
- efficient in attracting wild (sour) yeast. There is no exact
- recipe because there are so many other variables in each house
- that will invite or dissuade wild yeasts from entering the
- mixture. If at first you don't succeed, try, try again. The
- most important thing is the method.
- When you have decided on the ingredients you want, put them in
- a glass container that will hold at least three times the
- volume of the ingredients. Mix lightly with a wooden or
- plastic spoon as some metals will react to it. The working of
- the starter will mix itself.
- Leave the mixture undisturbed and loosely covered with a cloth
- or perforated plastic (to allow gases to escape) at warm room
- temperature until it begins to froth or "work" and expand.
- This is a sign that wild yeasts have made themselves at home
- and that's what you're after. The new starter will rise up in
- the container, then fall again. When it has, it's ready for
- use. (Note: It will smell sour!)
- When you use it, always leave some in the container and add
- flour and water back to equal what you've taken out. Most
- recipes call for a cup of starter, so replace it with a half-
- cup of flour and a half-cup of water and set it in a warm
- place to work again.
- You will probably see a liquid covering the top at one time or
- another. This is called "hooch," and it's exactly what it
- sounds like, but don't drink it! Actually, it's harmless, so
- stir it back into the starter if the starter is thick, or if
- it's thin, just pour the hooch off. It's nothing to worry much
- about either way.
- Keep sourdough in the refrigerator unless you use it at least
- every third day. If you use it that often, you can leave it on
- the counter or any place where it's safe. If you can't
- refrigerate it, you can keep it fresh by throwing out a cup of
- it every second or third day and then replenish withflour and
- water. Wait until it "works" again before counting days.
- A properly cared for starter can live indefinitely, but if you
- leave it out without using it for too long, the yeastcan
- literally suffocate in its own waste products. If the starter
- looks off color (grayish is normal) or turns pink, toss it and
- start fresh.
- What can you make with sourdough? Besides the traditional
- bread, you can make biscuits, pancakes, pretzels,bagels,
- muffins, cornbread and even cookies! Once you're comfortable
- using it, you can experiment with your favoriteyeast or
- baking powder recipes. Simply put, you substitute sourdough
- for leavening and part or all of the liquid.
- The basic recipe for plain sourdough bread:
- 1 cup starter
- 1 Tbsp. of fat (margarine, butter, vegetable oil or olive oil)
- 1 Tbsp. sugar
- 1 tsp. salt
- Enough flour to make a dough that can be handled without
- sticking, but is still pliable
- Knead by hand or machine until it's smooth, then cover and let
- it rise until it's doubled in bulk. This will take longer
- (sometimes over an hour longer) than yeast leavened bread, so
- don't give up and throw it out! Make sure you keep it warm,
- but not hot, while it's rising.
- Again, there is no hard and fast rule because circumstances
- are so variable. Your starter might be more or less robust, or
- thinner or thicker, or your kitchen may be warmer or cooler.
- After it's risen, punch it down and knead enough to remove all
- the bubbles, then form it into a loaf shape and put it in a
- lightly greased bread pan. You can sprinkle a little corn meal
- in the pan and on top of the loaf if you like. Let it rise in
- the pan, then bake at 350 for about 45 minutes.
- Baking sourdough bread is a learned skill and one that takes
- practice, but even if your first loaf doesn't meet your
- expectations, it will be edible. Once you become familiar with
- the process, you can experiment on making just about anything
- that is leavened. Biscuits, cookies, pancakes, cornbread,
- specialty breads and even cakes can be made using sourdough
- starter instead of yeast or baking powder.
- Besides creating incredibly delicious baked goods, you'll save
- a bundle of money over time by not buying yeast!
Wandas No Knead Bread

- 3 C all-purpose flourshopping list
- 1 Tbsp salt
- 1/4 tsp instant yeast
- 1 5/8 C water
- In a large bowl, stir together flour, salt, yeast, and water. Dough will be very shaggy and wet. It won't hold its shape. Don't worry! This is normal.
- Let dough rise 12-18 hours at room temperature. The dough is ready when it's doubled in volume and the entire surface is pocked with bubbles.
- Place a 6-8 quart heavy covered pot in the oven (cast iron, enamel, Pyrex, or ceramic), and preheat the oven to 450°F. When the oven reaches the desired temperature, take out the pot and lid.
- Pour the dough directly into the pot, scraping out any residue from the bowl. (The dough should be elastic and pull into long strands as it stretches.)
- Immediately cover with the lid, shake once or twice to make sure the dough is evenly distributed, and slide the whole thing into the oven.
- Bake for 30 minutes.
Wandas Homemade Bagels
- 1C warm water
- 1T sugar
- 1.5t yeastshopping list
- 1T salt
- 3C flour
- 3T chopped fresh rosemary
- rock salt for garnish
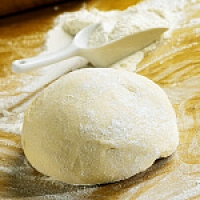
- Place yeast in warm water and sugar and allow to bloom. Add flour, salt and 2T rosemary(reserve 1T for garnish) and knead until smooth and shiny. Don't skimp on the kneading. Depending on your type of flour and the humidity, you may have to add a little more or less water.
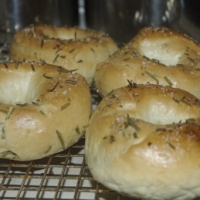
- Let rest at least 20 minutes so the dough can relax. Separate into eight equal sized balls and make into bagel shape by punching a hole in the center of each roll with a finger and stretching the hole out (with your finger) until it is at least 1 inch in diameter (the hole will get smaller once the bagels puff up).
- Place on a well floured cookie sheet and let rest another 20 minutes covered with a kitchen towel. At this point you should bring to boil at least 4 inches of water in a large pot with 2T sugar. After the 20 minute rest, place the bagels in rapidly boiling water for 45 seconds on each side. The heat of the water is very important since this is what will make the dough puff up and get chewy.
- Drain bagels on a tea towel and place on well greased cookie sheet and sprinkle with the rosemary and then salt .
- Bake at 450 for about 15-20 minutes.
Wandas Cornbread

- 1 C. self rising flour
- 2 C. cornmeal
- 1 Tbs. baking powdershopping list
- 1 egg
- buttermilk or sweet milk whichever you prefer
- Preheat oven to 450°
- Mix all ingredients except milk very well.
- Start adding milk a little at a time to mix well.
- Continue adding milk and stirring until mixture is a consistency of a thick soup.If you get it too thin add a little more flour.
- I always bake in an iron skillet sprayed with cooking spray and after I spray it I put it in the hot oven for about 1 minute and my corn bread never sticks to the skillet (I posted a pic of the corn bread while it is in the skillet and after it is turned out onto a plate).
- Bake for about 20 minutes or until golden brown.
Homemade Chicken Strips

- 3 pounds boneless skinless chicken breast halves
- 3 cups buttermilk
- 1 cup all-purpose flour
- 1 tablespoon italian seasoningshopping list
- 1 tablespoon garlic pepper
- 1/2 teaspoon paprika
- 2 eggs, lightly beaten
- 1 to 1-1/2 cups panko breadcrumbs
- 1/4 to 3/4 cup vegetable oil
How to make it
- Cut chicken lengthwise into 1-inch strips.Place in a shallow dish. Pour buttermilk over chicken; toss to coat.Cover and refrigerate at least 3 hours.
- In a 13" X 9" x 2" baking pan combine flour, Italian seasoning, garlic pepper and paprika.Using tongs, remove chicken from buttermilk, shaking off excess.Roll strips in flour mixture to coat.Arrange in a separate pan in a single layer.Pour eggs over strips.Toss until strips are evenly coated.Place panko in another shallow dish.Roll strips in panko to coat.
- In a large skillet cook chicken in hot oil, one-third at a time, about 5 to 7 minutes or until no longer pink, turning once.Keep cooked strips in a warm oven while cooking remaining chicken.
Subscribe to:
Comments (Atom)